Data Acquisition Overview
SIGVIEW supports real-time data acquisition from the following device types:
• Windows compatible sound cards (up to 16-bit resolution, up to 2 channels, old-style drivers)
• DirectSound compatible sound cards (maximal supported sound card resolution, typically 24-bit for professional sound cards, typically all available channels)
• ASIO sound card drivers (by Steinberg®) for low-latency and high fidelity sound card recording
• National Instruments® DAQ cards with support for NiDAQmx drivers (see www.ni.com)
• Measurement Computing® DAQ cards supported by Universal Library (see www.measurementcomputing.com)
• LabJack U3 and U6 USB DAQ devices (www.labjack.com)
• LabJack T4, T7 and T8 USB/LAN DAQ devices (www.labjack.com)
• Data Translation DT9837 devices (www.datatranslation.com)
• Data acquisition simulation by reading data from a specially prepared signal file
• Other device types may also be supported in custom SIGVIEW versions. Please see the following help chapters for all devices supported in your version.
SIGVIEW offers a generic user interface and settings for data acquisition from all supported devices. Device-specific settings (if available for certain device) are available by using additional dialogs (by clicking on the "Default-specific settings" button). To understand the settings available in these custom dialogs, please consult the user manual for your specific data acquisition device and device-specific pages in this manual.
To start data acquisition, select the “Data acquisition/Open data acquisition” menu option or the  toolbar button. A dialog appears which allows you to choose the data acquisition device and to change the data acquisition settings:
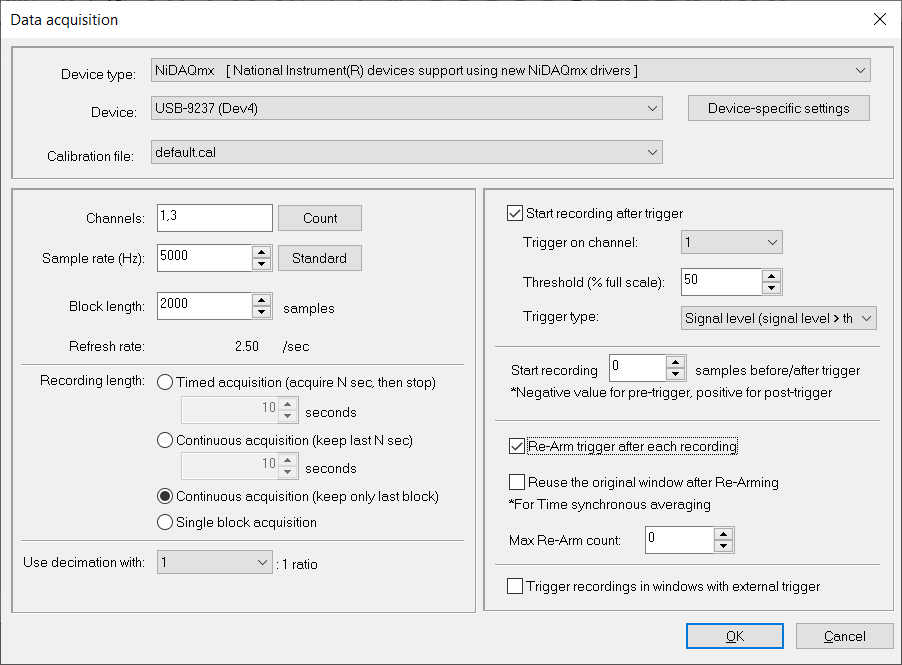
- Device type: Device type to be used. This corresponds to the above list of device classes supported by SIGVIEW. If you have no devices of specific type installed in your system, you will not see the corresponding entry in this combo-box. Some devices are available only in the PRO version.
- Device: Actual device to perform data acquisition. Only available devices from the selected device type will be shown in the combo-box.
- Device-specific settings button: Some devices allow special settings to be made, for example hardware triggering, input range, gain, etc. By pressing this button, a new device type specific dialog will open, allowing you to change device specific settings. For more information about these settings, please consult your hardware manual for the data acquisition device. If there are no specific settings for currently chosen devices, this button will be disabled.
- Calibration file: See calibration topic for details. Alternatively, some professional DAQ devices offer an “Automatic calibration” option. This means that SIGVIEW will try to obtain data in physical units (usually Volts) from the DAQ device.
- Channels: You can choose one of the following:
• A number of channels to use for the acquisition (first [1...NumberOfChannels] channels of the device)
• List of channels to use for the data acquisition (for example "1,4,7"). This option is available only if it is supported by the device itself.
By pressing the "List" button, an edit box will appear, instead of the combo-box for the selection of the channels number. In the edit box, you will be able to enter a comma-separated list of channel indexes (for example "1, 4, 7") which should be used for the data acquisition. Please note that not all devices support this method of exact channel selection.
By pressing the "Count" button, you will switch back to the channel count selection mode.
Please note that channel indexes in SIGVIEW are always 1-based, regardless of the indexes used by the actual devices. So, channels AI0, AI1,... described in the documentation of some DAQ devices will be referenced as channels 1, 2,... in SIGVIEW.
- Sample rate (samples/sec): This is the sampling rate for one channel. The maximum value is determined by your DAQ device capabilities. The combo box will show some standard sampling rates supported by most devices. Please note that this list is not device-specific. If you want to use some other, custom sampling rate, press the “Custom” button and enter the sample rate manually. Please note that some sound cards will simply report that they support any sampling rate, even if they don’t support it in hardware. Those will simply try to simulate the sampling rate on a driver level. If you want to avoid this, please consult the card's manual to determine which sample rates are really supported. Most devices do not allow arbitrary sample rate settings. SIGVIEW will try to find the next possible sample rate setting applicable to your device and apply it automatically. You will see the actual sampling rate in the status bar of the data acquisition window after you close this dialog.
- Block length (samples): SIGVIEW retrieves signal from your DAQ device in blocks of a constant length. After one block is retrieved, it is displayed in the DAQ window and processed with any attached analysis functions. This option enables you to define the block size, i.e. how many samples will be retrieved from device and shown in a window during acquisition. This is important setting because it does not only define the signal update rate, but also a block size for further processing in the following analysis windows.
- Recording length: This option enables you to define general behaviour of the data acquisition regarding the overall duration and recording length. The following options are available:
- Timed acquisition (acquire N sec, then stop): After the defined recording length in seconds has been reached, acquisition will stop. During acquisition, you will always see the last "Block length" samples in your acquisition window. After the acquisition stops, you can simply zoom-out to see the whole recording. Please note that SIGVIEW stores all data in physical memory (RAM). Therefore, this may not be the right recording method for very long recordings (more than several hours). You can use Logging data to file feature as an alternative for very long recordings.
- Continuous acquisition (keep last N sec): Data acquisition will run until manually stopped. During acquisition, you will always see the last "Block length" samples in your acquisition window. In the background, the last N seconds of the acquisition will be kept in memory (ring-buffer). After you stop the acquisition and zoom-out, you will see the last N seconds of the signal.
- Continuous acquisition (keep only last block): Data acquisition will run until manually stopped. During acquisition, you will always see the last "Block length" samples in your acquisition window. No data except the last block will be permanently stored in memory.
- Single block acquisition: Only one block of data (as defined by "Block length") will be retrieved and the acquisition will be stopped.
- Decimation ratio: To reduce the amount of data which has to be processed during analysis, you can use the decimation feature, i.e. conversion of multiple samples from the DAQ device to the one sample in SIGVIEW. You can define a decimation ratio by determining how many samples from the DAQ device will be converted to the one sample in SIGVIEW. If you choose a decimation ratio greater than 1, SIGVIEW will calculate the actual sample rate and show it as a read-only information under this field. For example, if the sample rate on a sound card is 44100Hz, and the decimation ratio is 100, then the actual sample rate in SIGVIEW will be 441Hz.
- Trigger recordings in windows with external trigger: Select this option if you want that the start of this recording (manual or triggered) also starts all other recordings which are waiting on "external trigger" (see below for more details about the "external trigger" type).
- Start recording after trigger: If you select this option, acquisition will not start immediately after pressing the START button – SIGVIEW will wait for a specific trigger (i.e. signal level) value in the signal, and then begin the acquisition automatically. Trigger behavior and the definition of trigger value is determined by using the following options:
- Trigger on channel: Determines which of the data acquisition channels SIGVIEW will monitor for a trigger value. It is possible to receive data on one channel and use the other one only for triggering.
- Threshold (% full scale): This option determines which signal level is regarded as a trigger value in the signal. Each sample with the amplitude higher than the threshold, by default 50%, from the maximum possible signal amplitude will be regarded as a trigger. For example, if your trigger is very strong signal impulse, you can set the threshold to 90%.
- Trigger type: This option enables you to choose the type of the trigger. The following types are available:
- Signal level: If signal level is above threshold (in % of the full scale)
- Absolute signal level: If absolute signal level (negative or positive sample value) is above threshold (in % of the full scale)
- Rising edge: If absolute signal level is above threshold (in % of the full scale), and the signal is rising
- Falling edge: If absolute signal level is above threshold (in % of the full scale), and the signal is falling
- External trigger: If external trigger type has been set, this recording will start after another window with the "Trigger recordings in windows with external trigger" option starts its recording. Please note that the start of this recording and trigger recording will not be perfectly synchronised as if using hardware-based triggering. You can expect to see a time difference of up to 1 block in length between recordings.
- Start recording X samples before/after the trigger: This option determines on which position, relative to the trigger position in signal, will the acquisition be started. The position is defined as a relative number of samples. A negative value will cause SIGVIEW to start acquisition before the trigger and a positive value to start it after the trigger. The maximal number of samples you can set for this option is equal to the "Block length" parameter (see above).
- Re-Arm trigger after each recording: After data acquisition is started after trigger, and required signal length has been recorded, data acquisition would normally stop. By turning this option on, you can instruct SIGVIEW to automatically open a new data acquisition window after the triggered data acquisition has been completed. A new data acquisition window will use exactly the same settings as the previous one, i.e. will wait on trigger, record, and then open new data acquisition window. This way, you can let SIGVIEW automatically record multiple triggered signal events. Each recording will be stored in a separate window. To limit the number of new windows which can be created during this operation, you can set the "Max Re-Arm Count" value. Please note that trigger Re-Arm options make sense only if you define some specific limited recording length. If you use some of "Continuous monitoring" recording length options, trigger will never be re-armed because recording will never stop. Please note that the number of recordings will always be equal to the "Max Re-Arm Count" +1.
- Reuse the same window after Re-Arming: This option works similar as the above "Re-Arm trigger after each recording" option, but does not create a new window after each re-arming. Instead, each new acquisition is started in the same window, deleting all previously recorded samples. This can be used only in combination with the "Single block acquisition" recording length option. If you attach an Averager window to your acquisition window, you will be able to perform Time synchronous averaging. To limit numbers of retrieved data blocks, you can set the "Max Re-Arm Count" option.
For further information about the triggering, please see the How-To: Using data acquisition triggering options.
Starting/stopping data acquisition
After you set all these data acquisition parameters and press the OK button, one or more signal windows will appear (depending on the number of channels). Now you can press the  button on the toolbar or select the “Data acquisition/Start” menu option to start data acquisition. If you choose "Continuous acquisition" as recording length, you can stop it by pressing the
  button on the toolbar or selecting the “Data acquisition/Stop” menu option. Otherwise, data acquisition will stop automatically after the desired acquisition length is reached. While data acquisition is running, you can work with the “signal window” as you would with any window containing static signal: for example, you can perform FFT of a running signal, track its changes as a 3D graphic, and as a result, you will have a real 3D spectrum analyser. All your analysis windows attached to the data acquisition window will always process the last acquired signal block.
After the data acquisition has finished, the signal in the data acquisition signal window is zoomed-in to show only the last recorded block. You will have to select the “Zoom-out” option to view the whole recorded signal.
You can also use the Control Window to start or stop multiple data acquisitions at once (context-menu option).
Resetting Data acquisition
After you have performed data acquisition and recorded some signal, you will not be able to start data acquisition in the same window again because it already contains recorded data.
If you would like to repeat the acquisition in the same window (for example, because the result of the first one was not satisfactory), you can reset the acquisition window by using "Data acquisition/Reset acquisition window" from the main menu. This function will bring the acquisition window to its initial state, enabling you to re-run data acquisition.
Using "File" driver
If you choose the ‘File’ driver type you will be able to simulate data acquisition by reading data from file in a 16-bit signed binary format (You can store any data in that format by using the Binary file export feature). After clicking on the “Device specific options” button, you will be able to choose the file name. SIGVIEW will try to keep the desired sample rate if there is sufficient data in the file.