National Instruments® Data Acquisition
SIGVIEW supports data acquisition of analog signals by using most National Instruments® data acquisition devices (www.ni.com).
For general concepts and details regarding data acquisition in SIGVIEW, please see the Data acquisition overview. A standard NiDAQmx driver is used for data acquisition.
Selecting 'NiDAQmx' as the device type in the dialog allows you to access and configure various device-specific settings:
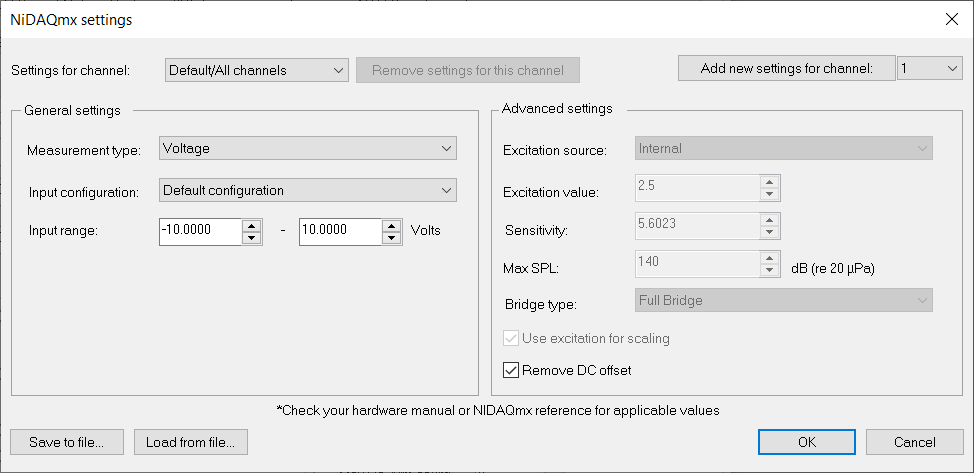
Your first step is to determine the appropriate measurement type by using 'Measurement type' combo-box, which varies based on the sensor and DAQ device you're using. Consult your DAQ device's manual to make an informed choice. Each measurement type available in SIGVIEW corresponds to specific functions of the low-level NiDAQmx driver.
To learn more about the parameters for each measurement type, visit the NI website (ni.com). Use the function names as keywords to search for relevant information on the measurement types and their parameters.
Voltage: daqmxcreateaivoltagechan
IEPE Force: daqmxcreateaiforceiepechan
IEPE Velocity: daqmxcreateaivelocityiepechan
Acceleration: daqmxcreateaiaccelchan
Microphone: daqmxcreateaimicrophonechan
Voltage with excitation: daqmxcreateaivoltagechanwithexcit
"Voltage" measurement is a default measurement type and should work with most devices. Other types of measurement will usually need special device types with excitation, IEPE option etc.
It's important to note that you can configure some settings even if your current device does not support it. These settings are universal and will be applied across all compatible NI devices, both current and future ones. If your device does not support the settings, you will get an error message after you try to start the data acquisition.
Using custom settings for channels
In this dialog, you can individually adjust the settings for each channel. The channel you're currently modifying is displayed in the upper left corner, within the 'Settings for channel' combo-box. This combo-box always includes the 'Default/All channels' option, which represents the settings applied to any channel without customized settings.
To customize settings for a specific channel, click the 'Add new settings for channel' button located in the top right part of the dialog. Select the channel index from the drop-down menu first.
It's important to note that you can configure settings for a specific channel even if your current device does not support it. These settings are universal and will be applied across all compatible NI devices, both current and future ones.
Once you add a new channel, its index will appear in the 'Settings for channel' drop-down menu, allowing you to select it and modify its settings at any time.
If you wish to remove custom settings for a channel, select the channel in the 'Settings for channel' menu and click the 'Remove settings for this channel' button. Removing a channel's custom settings reverts it to the 'Default/All channels' settings.
Saving/Loading settings
All settings from this dialog will automatically be saved and used for all future data acquisitions. If you have several sets of different settings, you may wish to save those to separate files, and load them if needed. To do so, you can use 'Save to file...' and 'Load to file...' buttons in the lower left corner of the dialog.
Troubleshooting
If your device cannot support certain parameters, an error message will be generated by the NI driver. Should this occur, refer to your device's manual for guidance and try adjusting the settings accordingly.
As an illustration, measurement types that require excitation are particularly sensitive to the input range parameter. It is crucial to ensure that the chosen input range matches the requirements of your device for the specific mode in use.